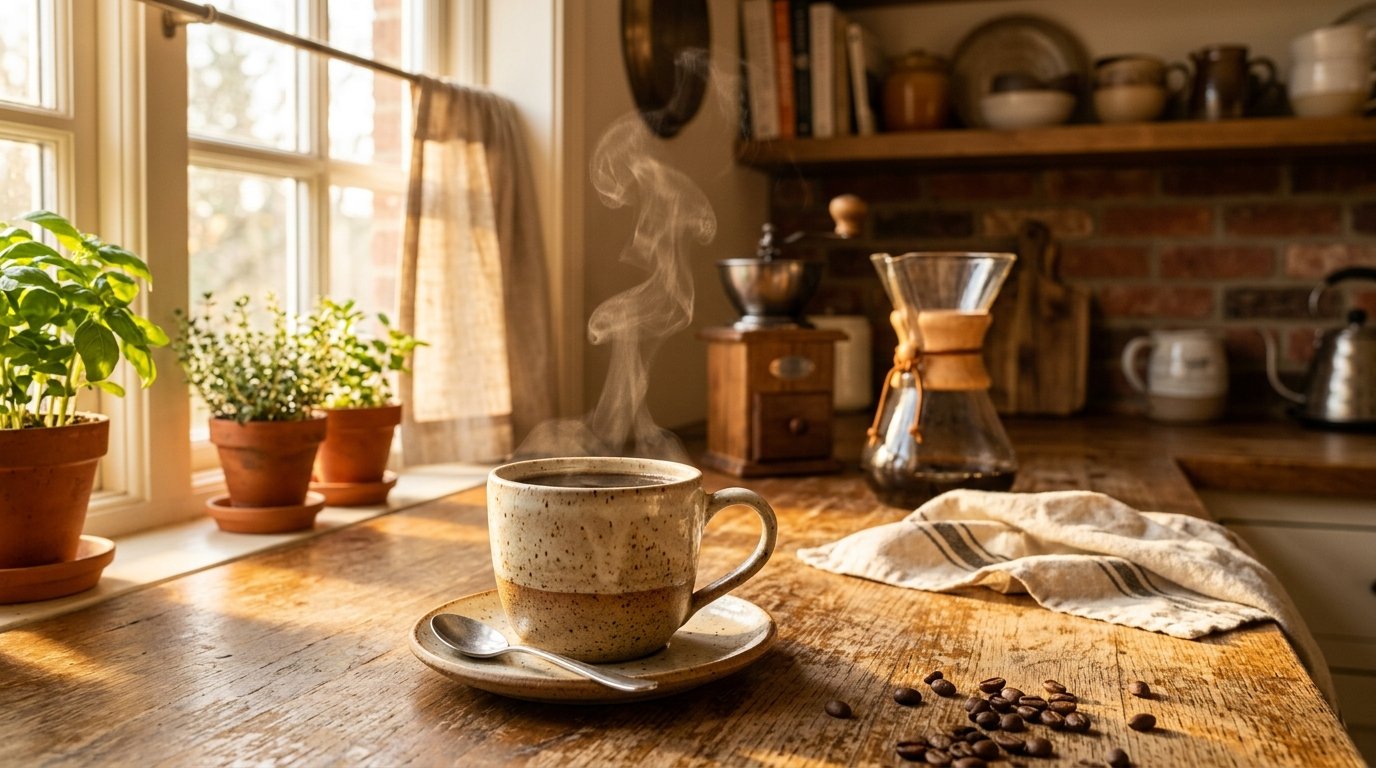
Making coffee at home sounds simple — and it really is. But if you've never done it before, it's easy to end up with something too weak, too bitter, or just… not quite right. The good news? A great cup of coffee doesn't require expensive equipment or barista training. It just takes a few minutes and knowing what to do.
In this guide, we'll walk you through making your very first cup at home using a drip coffee maker — the most beginner-friendly method out there. We'll cover everything: what you need, how much coffee to use, and exactly what to do, step by step. By the end, you'll have a cup you're proud of and the confidence to make it again tomorrow morning.
If you're still figuring out what equipment you need to get started, check out our guide on what you need to make coffee at home before diving in here.
To make your first cup of coffee at home: fill your drip coffee maker's reservoir with cold water, place a paper filter in the basket, add 2 tablespoons of ground coffee per 6 oz of water, press brew, and wait about 5 minutes. Pour into your mug and enjoy — it really is that straightforward.
What You'll Need

You don't need a lot to make a great cup of coffee. Here's everything to have on hand before you start:
Equipment
- Drip coffee maker — Any basic model will do the job. If you don't have one yet, we recommend the Black+Decker 12-Cup Coffee Maker as one of the most reliable budget options for beginners. Want to compare a few options before buying? See our Best Coffee Maker for Beginners roundup.
- Paper coffee filters — Check the filter size your machine requires (usually listed on the box or in the manual — most standard drip makers use a #4 basket filter).
- A coffee mug — Any mug works. A standard mug holds about 12 oz.
- A measuring spoon or tablespoon — For measuring your coffee grounds consistently.
Ingredients
- Ground coffee — For drip machines, you want a medium grind. Most pre-ground coffee sold in bags is already at medium grind and works perfectly. If you're grinding your own beans, see our guide on the best budget grinders for beginners.
- Water — Cold, fresh tap water works well. If your tap water has a strong taste or smell, filtered water will make a noticeable difference in your cup.
Coffee-to-Water Ratio
This is the single most important thing to get right. Use too little coffee and it tastes watery. Use too much and it's bitter and overpowering.
| Cups of Coffee | Water | Ground Coffee |
|---|---|---|
| 1 cup (6 oz) | 6 oz | 2 tablespoons |
| 2 cups | 12 oz | 4 tablespoons |
| 4 cups | 24 oz | 8 tablespoons (½ cup) |
| Full pot (12 cups) | 72 oz | 24 tablespoons (1½ cups) |
Note: Coffee maker “cups” are usually 5–6 oz, not the 12 oz mug you drink from. When brewing a “12-cup pot,” you're actually making about 72 oz — or roughly 6 normal mugs.
Want to understand the ratio more deeply — including how to adjust it for different brewing methods and taste preferences? See our full Coffee-to-Water Ratio guide.
Before You Start — Quick Tips for Success
These three habits make a bigger difference than most people realize:
Use fresh coffee. Ground coffee starts going stale within a couple of weeks of opening. If your bag has been sitting in the pantry for a few months, your cup will taste flat no matter what you do. Aim to use your coffee within 2–3 weeks of opening the bag.
Start with cold, fresh water. Always fill the reservoir with fresh cold water — never hot water from the tap and never water that's been sitting in the machine from a previous brew. Stale water leads to a flat-tasting cup.
Clean your machine. If you're using a machine that hasn't been run in a while, run a brew cycle with just water first (no coffee) to rinse it out. Old coffee residue can make your brew taste off before you even get started.
Don't skip the measuring step — at least not at first. Even experienced home brewers who “eyeball it” usually brew coffee that's a bit too weak because they underestimate how much coffee they need. Measure carefully for your first few brews, then adjust to taste from there.
Step-by-Step: How to Make Your First Cup of Coffee
Step 1: Fill the Reservoir with Cold Water
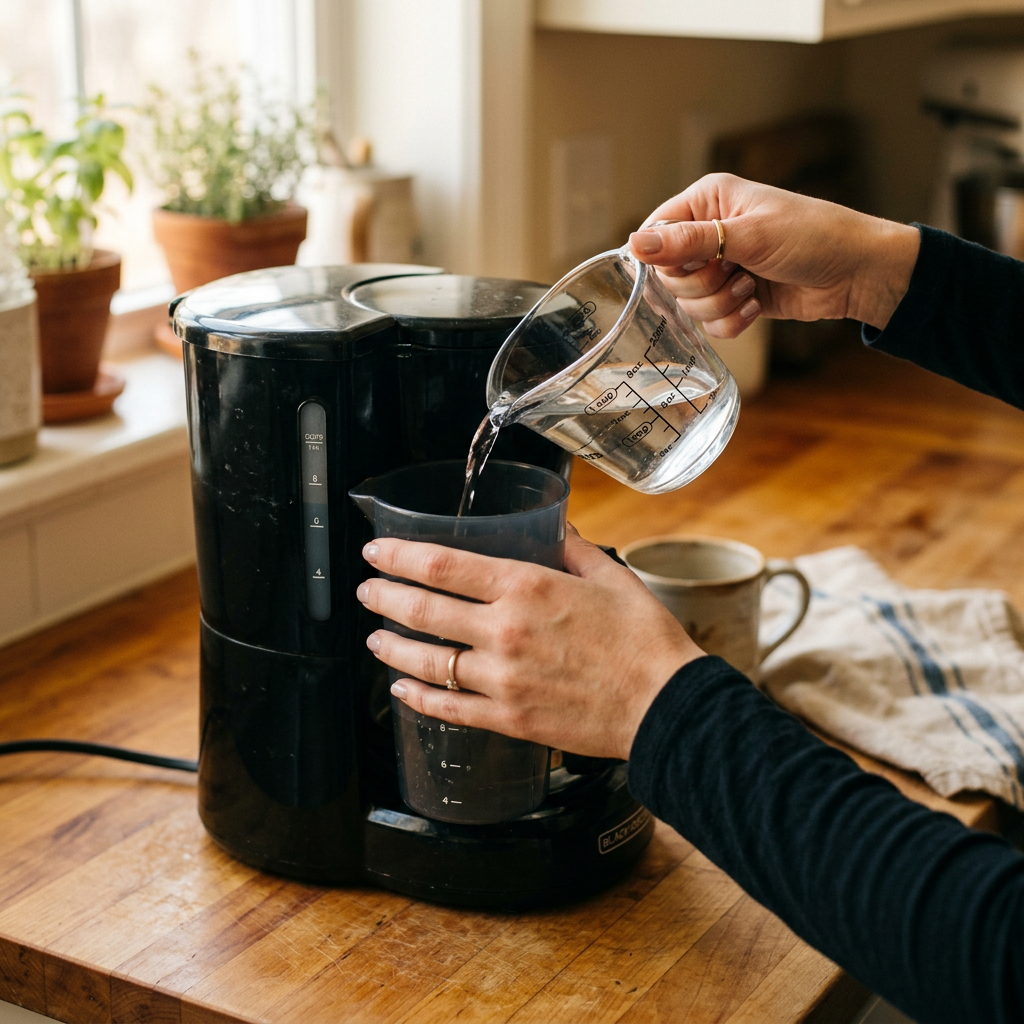
Open the water reservoir lid on your coffee maker and pour in cold, fresh water. Use the markings on the side of the reservoir to measure — fill to however many cups you want to brew. For a single mug, fill to the 1–2 cup mark.
Close the reservoir lid when you're done.
Step 2: Place a Filter in the Basket
Open the filter basket (usually a swing-out door or a lift-up lid near the top of the machine). Place a paper filter inside. If it's a cone-shaped filter, fold the bottom seam first so it sits flat in the basket. If it's a flat-bottomed basket filter, simply open it up and set it in.
Give the filter a quick rinse with cold water if you want — this removes any paper taste and helps the filter stick to the sides of the basket so it doesn't collapse when you add grounds. It's optional, but worth doing if you're sensitive to off-flavors.
Step 3: Measure and Add Your Coffee Grounds
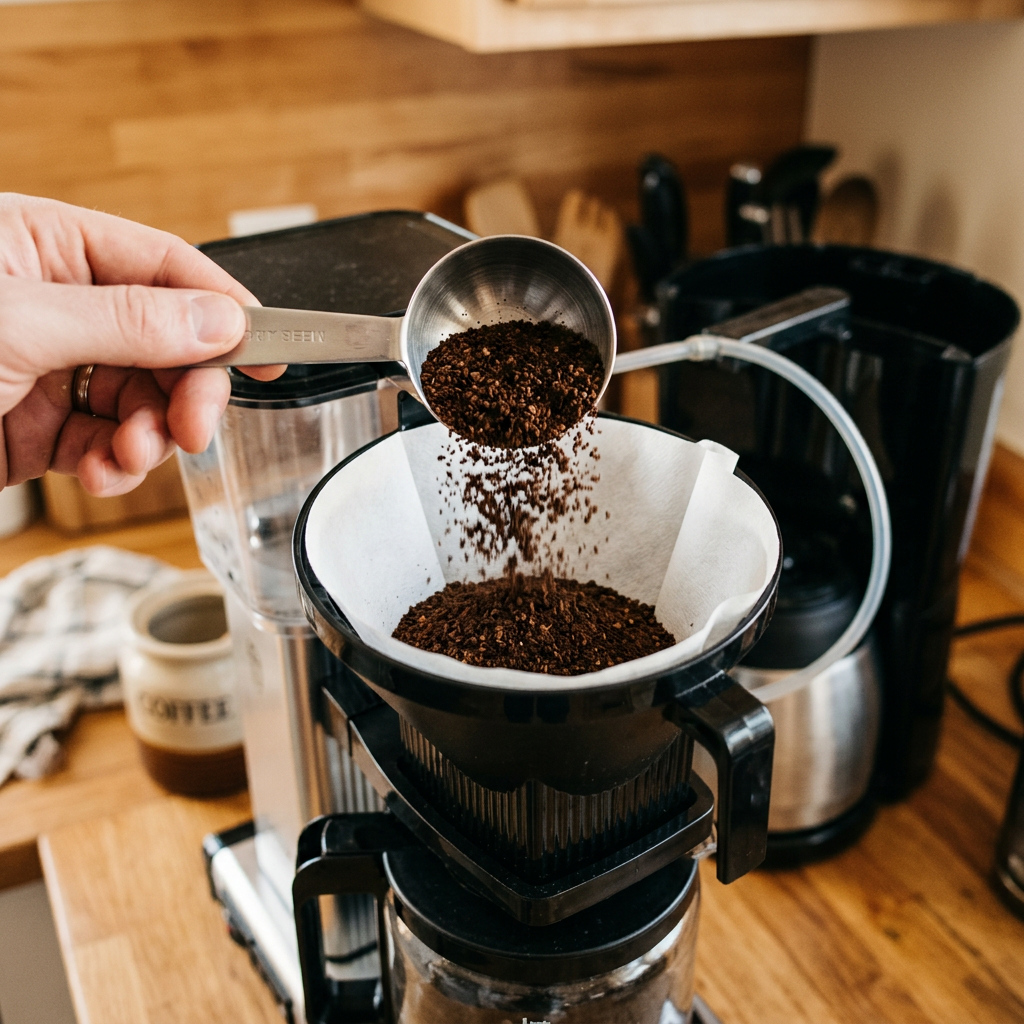
Using your measuring spoon, add 2 tablespoons of ground coffee per 6 oz of water you're brewing. Refer back to the ratio table above if you're making more than one cup. Level off each tablespoon — don't pack it down or mound it.
Spread the grounds evenly across the filter so they're not all piled in the center. Then close the filter basket.
The most common beginner mistake is using too little coffee — which results in a weak, watery cup. Resist the urge to use less to “save” coffee. Two tablespoons per 6 oz is the starting point; go from there once you know what you like. Using too much coffee makes it bitter and harsh, so stick close to the ratio until you find your sweet spot.
Step 4: Press Brew
Make sure the carafe (the glass pot) is in place on the warming plate. Then press the power or brew button on your machine. Most basic drip coffee makers have a single button — press it and you're off.
The machine will heat the water and push it through the grounds. You'll hear gurgling and dripping — that's exactly what's supposed to happen. Give it about 5 minutes to complete the brew cycle.
Step 5: Pour and Enjoy
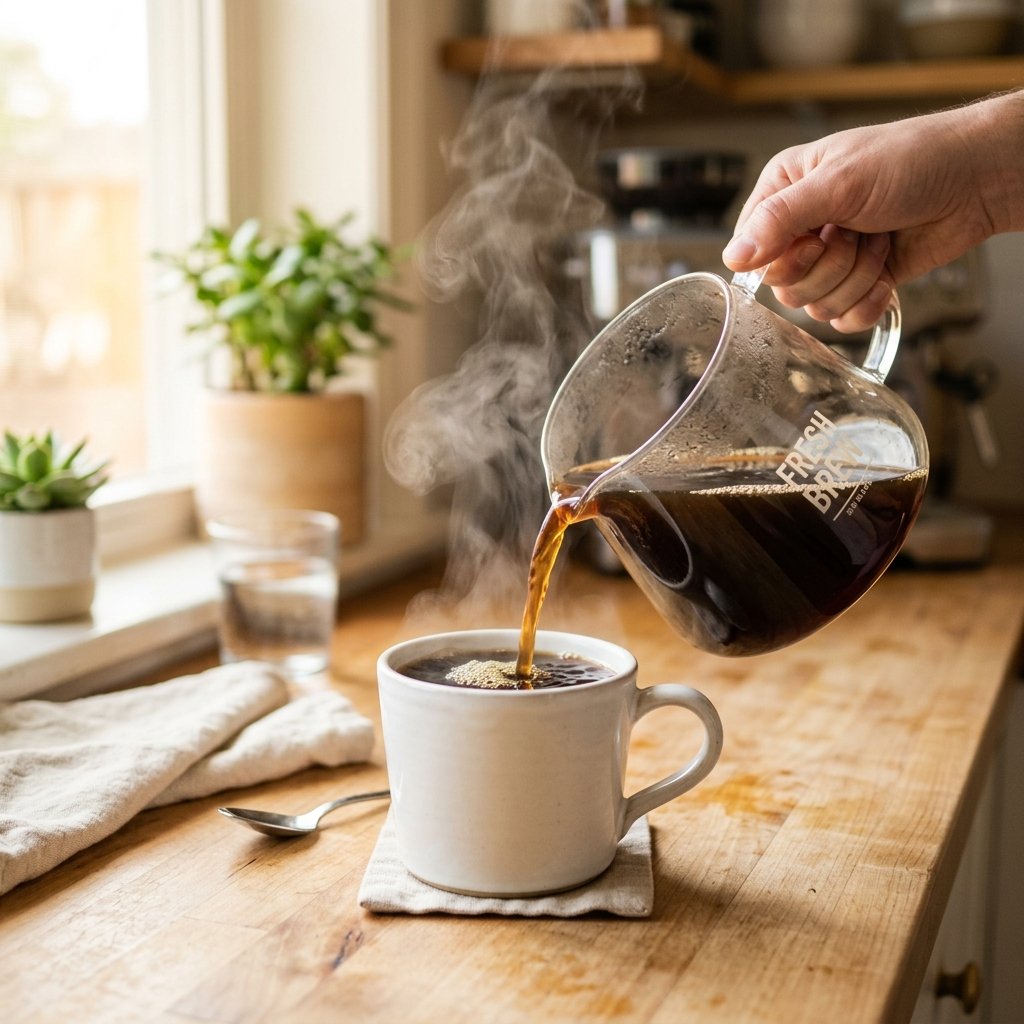
Once brewing is complete, remove the carafe and pour your coffee into your mug. Be careful — the carafe and the coffee inside will be hot.
Add anything you like: a splash of milk, a bit of cream, sugar, or enjoy it black. Your first cup is ready.
Don't leave coffee sitting on the warming plate for more than 20–30 minutes. The heat continues to cook the coffee and makes it taste burnt and bitter. If you're not drinking the whole pot right away, pour the rest into an insulated thermos to keep it fresh.
How to Know If You Did It Right
Your brew should look, smell, and taste like this:
Color: A rich, medium-to-dark brown — not pale yellow or translucent (too weak) and not almost black and syrupy (too strong). Think the color of a chocolate brownie.
Smell: Warm, roasty, and inviting. If the smell is sharp and acrid, it may be slightly over-extracted. If it smells faint or watery, it's likely under-extracted.
Taste: Balanced — a little bitterness is totally normal and expected. It shouldn't be sour (which usually means under-extracted or old grounds), and it shouldn't be so bitter it's undrinkable (usually too much coffee or too coarse a grind for the method).
If your first cup isn't perfect, that's completely normal. Coffee takes a little dialing in. Adjust one thing at a time — usually starting with the amount of coffee you use.
Troubleshooting — If Something Went Wrong
My coffee tastes watery or weak. You didn't use enough coffee grounds. Add more next time — try 2.5 tablespoons per 6 oz and see if that helps. Also check that your filter basket isn't leaking or overflowing.
My coffee tastes really bitter. This can mean you used too much coffee, or the coffee has been sitting on the warming plate too long. Try reducing your grounds slightly and pouring immediately after brewing. It could also mean your coffee is old and stale.
My coffee maker stopped mid-brew. This is almost always a water issue — either the reservoir wasn't filled enough, or something is blocking the flow. Unplug, let it cool down, refill, and try again. Some machines also have auto-shutoff features that activate after a set time.
There are grounds in my cup. Your paper filter may have collapsed during brewing. Make sure you're using the right size filter for your machine, and try rinsing and pressing the filter against the sides of the basket before adding grounds.
- Use 2 tablespoons of medium-ground coffee per 6 oz of cold, fresh water — that ratio is the foundation of a good cup.
- Always start with cold water and a clean machine — small prep habits make a big difference.
- Drip coffee is ready in about 5 minutes. Don't leave it on the warming plate longer than 20–30 minutes or it'll taste burnt.
- If something tastes off, adjust one thing at a time — usually the amount of coffee is the first thing to tweak.
Keep Going — Your Next Steps
You just brewed your first cup at home — and it only gets easier from here. The more you do it, the more you'll naturally start to notice what you like: a little stronger, a little lighter, maybe with a different roast. That's the fun part.
When you're ready to explore more, here are a couple of good next steps: if you want to compare coffee makers before upgrading, our Best Coffee Maker for Beginners guide walks through the top options at every budget. And if you're curious about grinding your own beans for even better flavor, our Best Budget Coffee Grinders for Beginners guide is a great place to start.
Welcome to home coffee — you've got this.
Disclosure: This article contains affiliate links. If you purchase through our links, we may earn a small commission at no extra cost to you. We only recommend products we genuinely believe are right for beginners. Full disclosure here.
☕ About the Author
Greg Rathbone is the founder of HomeCoffeeBeginner.com. He started this site after finding that most coffee advice online assumed you were already an expert. Every guide here is written for total beginners — tested in his own kitchen in Oklahoma, with zero snobbery.